
BME690
Overview
We are excited to introduce the BME690 gas sensor, the latest addition to our portfolio of gas sensors. This innovative sensor has all the features of BME688 and in addition is specifically designed to perform robustly in high condensation environments while offering reduced power consumption in Index for Air Quality (IAQ) modes.
Ecosystem Update
The BME AI-Studio ecosystem has been enhanced to support the BME690 variant, providing users with an improved experience and expanded functionality. The ecosystem comprises of the following tools:
- BME690 Development Kit
- Firmware
- BME AI-Studio Desktop
- BBME AI-Studio Mobile App
For more information and to download the software please visit the BME690 product page
Quick Introduction to BME690 Development Kit
The kit comprises of the BME690 8x shuttle board and Application Board 3.1
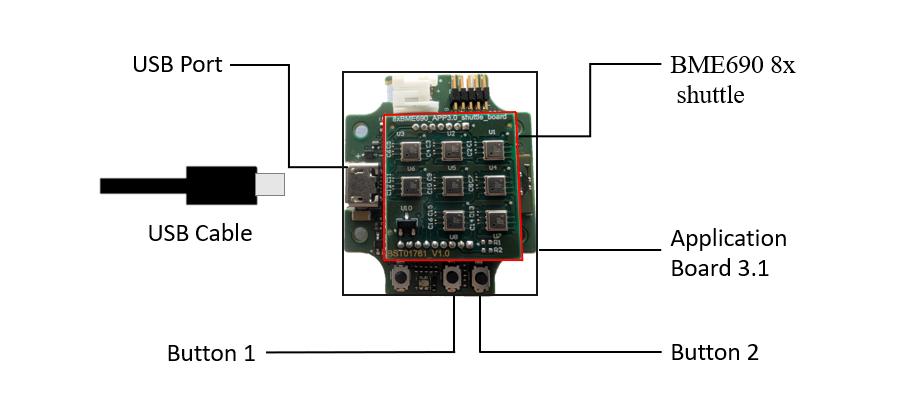
The Application Board 3.1 features internal storage for files, allowing users to copy and retrieve them by connecting the board to a computer via a USB cable.
Copying and Retrieving Files from Application Board 3.1
- The Application Board 3.1 comes preloaded with the MTP firmware update package.
- To switch to MTP mode, press and hold Button 2 while turning the board OFF and then ON. The green LED will illuminate, indicating that the board is in MTP mode.
- The device will appear as an MTP device named "Application Board 3.1."
- Click on the device and select "W25M02 External Memory." This will display a list of all available files, allowing you to copy any required files.
Preparing Log Files for BME AI-Studio Import
- The Application Board 3.1 logs data in a specific format to minimize file size, so it is essential to use a conversion tool before importing the data into BME AI-Studio Desktop.
- The conversion tool is included in the firmware release package and can be found in the
"tools\converter\data"directory. - Copy the input files retrieved from the Application Board 3.1 to the
"tools\converter\data"directory. - The required input files are
- Recording mode -
.udf,.labelinfoand.bmeconfig - Live test algorithm mode -
.udf,.bmeconfig,.labelinfo,.configand.aiconfig
- Recording mode -
- Execute the "run_me.bat" file located in the
"tools\converter\data"directory. - The converted files will be available in the
"tools\converter\data\output"directory. - The converted output files are:
- Recording mode -
.bmerawdataand.bmelabelinfo - Live test algorithm mode -
.bmerawdata,.aipredictionand.bmelabelinfo
- Recording mode -
- The converted files are now ready for import into BME AI-Studio Desktop.
Process Steps
The overall workflow for BME690 follows the same six process steps as mentioned in the documentation for the BME688 — Configure Board, Record Data, Import Data, Collect Specimen, Train Algorithm, and Evaluate Algorithm. The core concepts, tooling, and procedures are identical across both sensors. The only notable difference is the initial board type selection, where users must select BME690 instead of BME688. All other steps proceed in exactly the same manner.
This section highlights only the BME690-specific changes and additions. For a complete, step-by-step explanation of the full workflow, please refer to the Process Steps documentation, which applies equally to both sensors.
Configure Board
The ecosystem continues to support the older BME688 development kit, with modifications made to ensure compatibility with both the BME690 and BME688. A board type selection feature has been introduced that allows users to choose between the supported development kits. This board type information is also recorded in the generated configuration files and raw data files to prevent any mix-up of data or models between the two development kits.
Kindly refer to Configure Board section for further information. 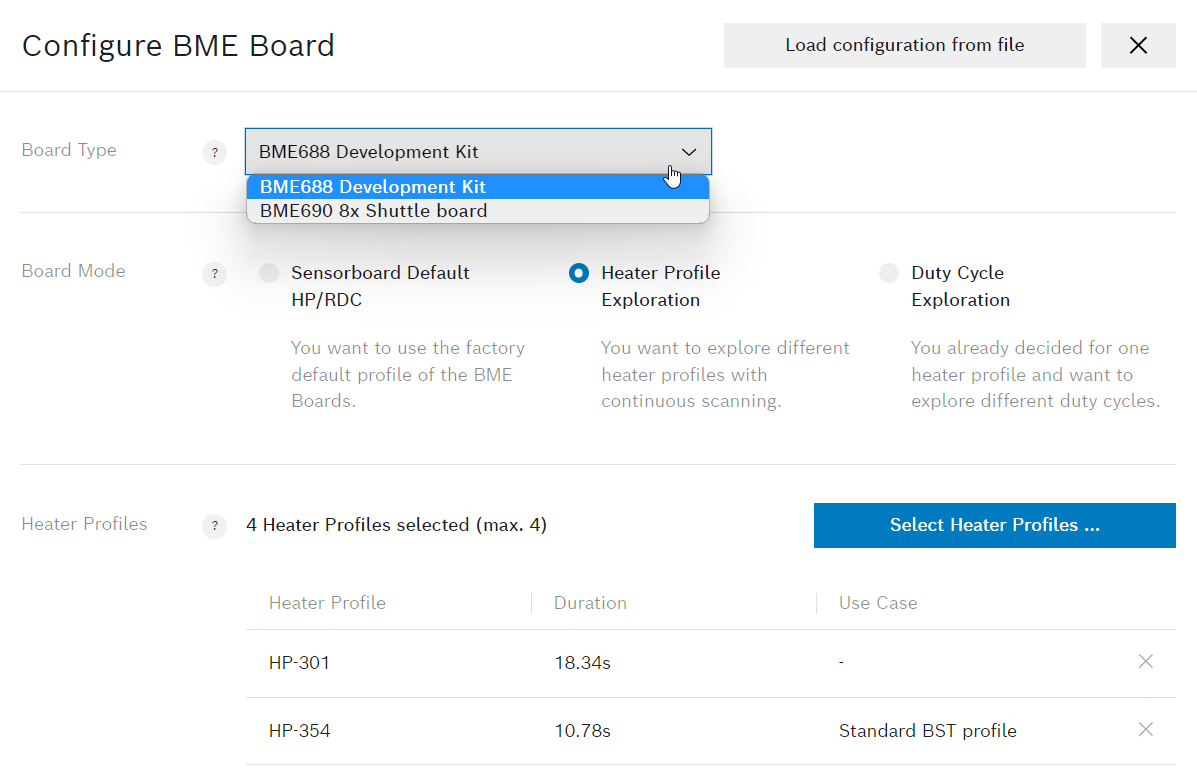
Record Data
Copy the generated .bmeconfig file to the Application Board 3.1. For more information please refers to Copying and Retrieving Files in the above section.
Connect the board with a micro USB cable to start recording the data. Once the board is connected to power it will automatically turn on and start recording.
Define Specimens during measurement via on-board buttons 1 & 2 to mark specific duration as specimens. You can also use the BME AI-Studio Mobile App to label your data during recording or you can also add new Specimen definitions manually during import by clicking Add Specimen
Please note
Please be aware that the Development kit for the BME690 do not include a Real-Time Clock (RTC) module. Therefore, the timestamp details in the specimens collected have been replaced by duration allowing user to identify the time intervals.
Removing the power will stop the recording.
Import Data
- Copy the log file from the Application Board 3.1 to the computer
- Convert the files to ensure compatibility for import into the BME AI-Studio Desktop.For more information please refer to Preparing Log Files in the above section
- Kindly refer to Import Data section for further information
Collect Specimen
During measurement either Button 1 or Button 2 on the BME690 Development Kit can be used to mark specific moments as a new Specimen. These Specimen definitions will appear as Specimens during after data import to the BME AI-Studio Desktop.
Specimens can also be defined using the BME AI-Studio Mobile App.
Please refer to the Collect Specimen section for more information
Train Algorithm
Users can now select either the BME688 or BME690 as the board type, and the respective specimens will be populated accordingly based on the selected board type.
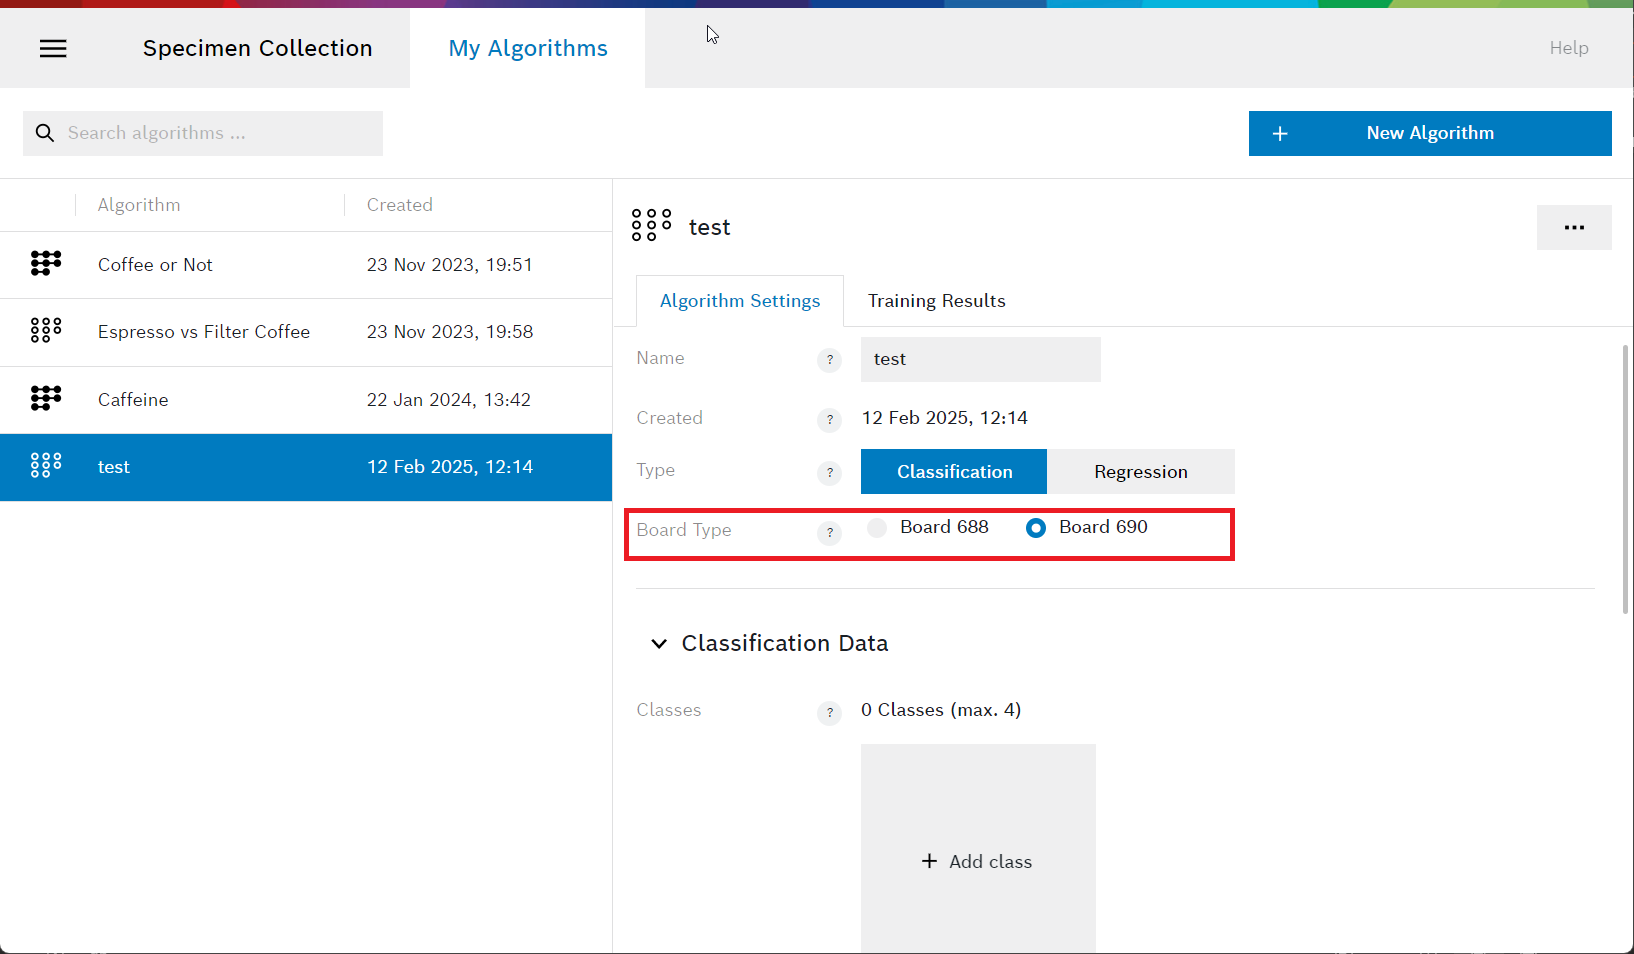
Please note that specimens collected from the BME688 board cannot be used to train the algorithm on the BME690, and vice versa. Interchanging specimens may alter the model's characteristics and is not recommended.
The image below shows specimens categorized by board type: BME688 on the left and BME690 on the right.
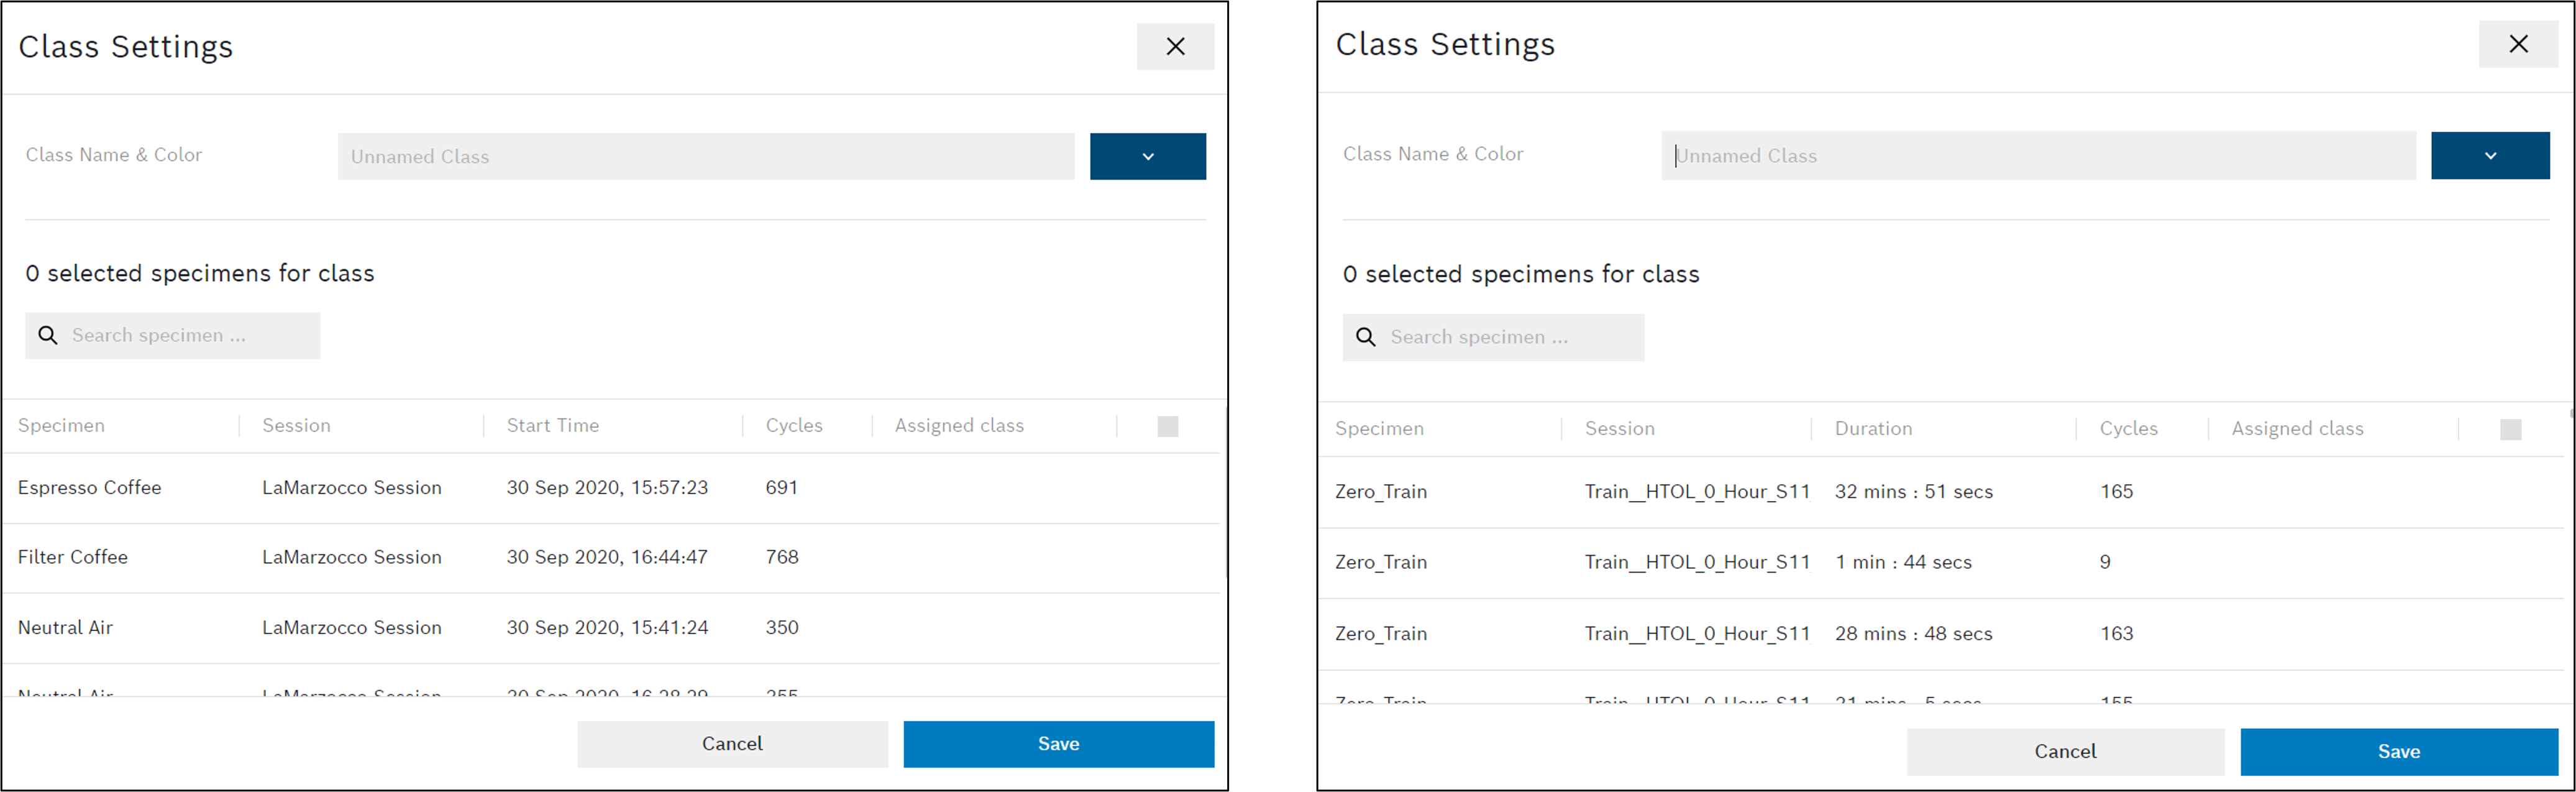
Refer to the Train Algorithm section for more information
Evaluate Algorithm
The algorithm evaluation process for BME690 is identical to that of the BME688. Users can assess model performance, review prediction results, and export the trained algorithm using the same workflow.
For a full walkthrough of the evaluation steps, refer to the Evaluate Algorithm section, which applies to both BME688 and BME690 Refer to the Evaluate Algorithm section for more information
BSEC Export
The BSEC export process for BME690 is identical to that of the BME688. However, please note that BME690 requires BSEC version 3.2.0.0 or above. Ensure that the correct BSEC version is selected during export to maintain full compatibility with the BME690 sensor.
For details on BSEC versioning and compatibility, please refer to the BSEC Export section. For BME690 the BSEC version 3.2.0.0 and above are only supported.
Supported Ecosystem
Refer to the BSEC version compatibility section for full details on supported tool versions.